Table of Contents
Automated Invoice
This article describes how to automate the generation of invoices in Excel. If you are in a hurry simply download the Excel file.
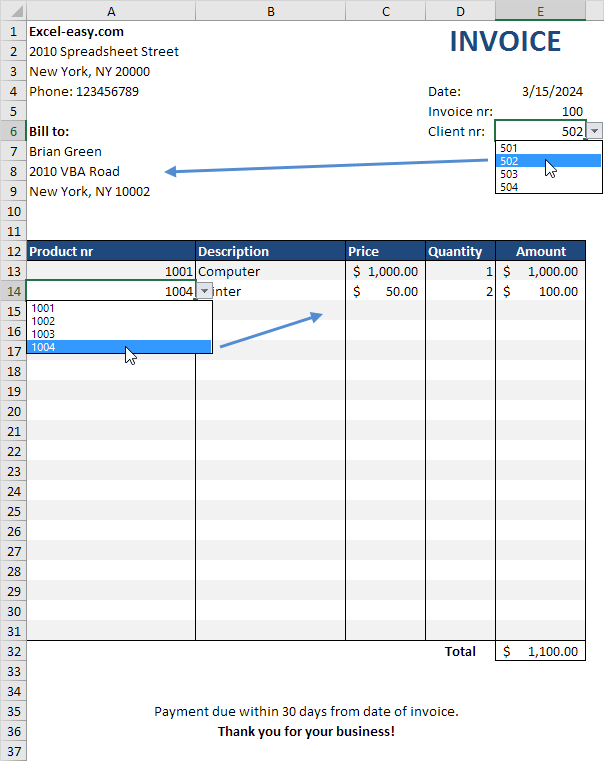
This is what the spreadsheet looks like. If you select a Client nr from the drop-down list in cell E6 Excel automatically fills in the client information. If you select a Product nr from one of the drop-down lists in cells A13 through A31 Excel automatically fills in the product information.
Below we’ll explain how we automated the entry of the product information. The same tricks have been used for the client information.
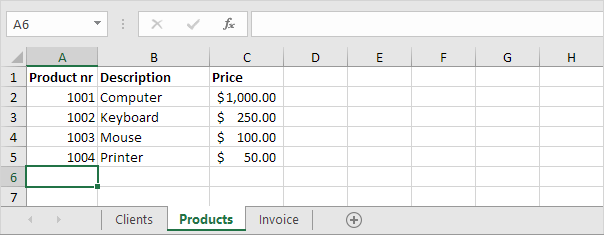
1. On the Products sheet type the product information.
2. On the Invoice sheet select cells A13 through A31.
3. On the Data tab in the Data Tools group click Data Validation.
4. In the Allow box click List.
5. Click in the Source box and select the range A2:A5 on the Products sheet.
6. Manually change the 5 to 1048576 (or any other large number) to include more cells. Now you can add as many new products as you want.
7. Click OK.
8. Select cell B13 and enter the formula shown below.
Explanation: If cell A13 is empty the formula returns an empty string. If not the VLOOKUP function looks for the Product nr (1001) in the leftmost column of the range $A:$C (columns A to C) on the Products sheet and returns the value in the same row from the second column (col_index_num is set to 2).
9. Select cell C13 and enter the formula shown below.
Explanation: This formula is almost the same as the previous formula. This time it returns the value in the same row from the third column (col_index_num is set to 3).
10. Select cell E13 and enter the formula shown below.
Explanation: If cell A13 is empty the formula returns an empty string. If not it returns the product of Price and Quantity.
11. To copy the formulas to the other cells select the range B13:E13 and drag it down to row 31. Use the Format Painter to restore the formatting.
