Table of Contents
Changing rows to columns in Excel can be a useful technique when you need to reorganize your data for better analysis or presentation. In this article, we will explore the step-by-step process of transforming rows into columns in Excel. We will also discuss troubleshooting common issues and provide some helpful tips for efficient data transformation.
Understanding the Basics of Excel Layout
Before we dive into the transformation process, let’s take a moment to understand the importance of rows and columns in Excel. Rows are horizontal and are identified by numbers (1, 2, 3, etc.), while columns are vertical and labeled with letters (A, B, C, etc.). The cell where a row and column intersect is called a cell reference (e.g., A1).
Rows and columns together create a grid-like structure that forms the foundation of organizing and analyzing data in Excel. Understanding how these elements work will help you make effective transformations.
The Importance of Rows and Columns in Excel
Rows and columns are crucial for organizing and manipulating data in Excel. Each row represents a unique data entry, while each column represents a specific attribute or variable. By converting rows to columns, you can group related data, improve data visibility, and make it easier to analyze and interpret large datasets.
Differentiating Between Rows and Columns
It’s important to differentiate between rows and columns in Excel. Rows represent a set of data entries, while columns represent attributes or variables associated with those entries. Understanding this distinction is essential when transforming rows to columns, as it determines how your data will be rearranged and interpreted.
When working with rows and columns in Excel, it’s essential to pay attention to the row height and column width. Adjusting the height of rows and the width of columns can help in presenting data more clearly and neatly. You can resize rows and columns by hovering over the border between two row numbers or column letters until the cursor changes to a double-headed arrow, then click and drag to adjust the size.
Furthermore, Excel provides various formatting options for rows and columns to enhance the visual appeal of your data. You can change the background color, font style, alignment, and borders of rows and columns to make specific data stand out or to create a more structured layout. Utilizing these formatting features can improve the readability and overall presentation of your Excel spreadsheets.
Preparing Your Excel Sheet for Transformation
Before we proceed with the transformation process, it’s crucial to prepare your Excel sheet appropriately. Here are a few key steps:
Identifying the Data to be Transformed
First, identify the specific rows and columns you want to transform. You can do this by selecting the desired range using your mouse or by entering the cell references directly into the formula bar at the top of the Excel window. Make sure to select all the relevant data to ensure accurate transformation.
When selecting the data for transformation, consider any formatting or special characters that may impact the process. It’s essential to have a clear understanding of the data structure to avoid any errors or discrepancies in the transformed output. Additionally, double-check for any hidden rows or columns that might affect the transformation results.
Backing up Your Original Data
Before making any changes to your data, it’s always a good practice to create a backup. This way, you can easily revert to the original dataset if something goes wrong during the transformation process. Simply copy the selected range and paste it into a separate sheet or workbook.
Creating a backup not only provides a safety net in case of errors but also allows you to compare the original and transformed data for validation purposes. By keeping a backup copy, you can track the changes made during the transformation and ensure the accuracy of the final output. Remember, data integrity is key when working with transformations, so maintaining a backup is a best practice.
Step-by-Step Guide to Changing Row to Column
Now that we have prepared our Excel sheet, let’s explore two different methods for changing rows to columns.
When working with Excel spreadsheets, it’s common to need to reorganize data from rows to columns or vice versa. This can be particularly useful when you want to display your data differently or perform specific calculations. Let’s delve into the process of changing rows to columns using two efficient methods.
Using the Transpose Function
The Transpose function in Excel allows you to quickly convert rows to columns. Here’s how:
- Select the range of data you want to transpose.
- Right-click on the selected range and choose “Copy” from the menu.
- Select the cell where you want to paste the transposed data.
- Right-click on the cell and choose “Paste Special” from the menu.
- In the Paste Special dialog box, check the “Transpose” option.
- Click on the “OK” button to apply the transpose.
Utilizing the Transpose function is a straightforward way to switch rows to columns in Excel. By following these steps, you can efficiently restructure your data without the need for manual adjustments. This method is particularly handy when dealing with large datasets that require quick reorganization.
Utilizing Paste Special for Transformation
If you prefer using keyboard shortcuts, the Paste Special feature can also be used to change rows to columns. Here’s how:
- Select the range you want to transform.
- Press “Ctrl+C” to copy the selected range.
- Select the cell where you want to paste the transposed data.
- Right-click on the cell and choose “Paste Special” from the menu.
- In the Paste Special dialog box, check the “Transpose” option.
- Click on the “OK” button to apply the transpose.
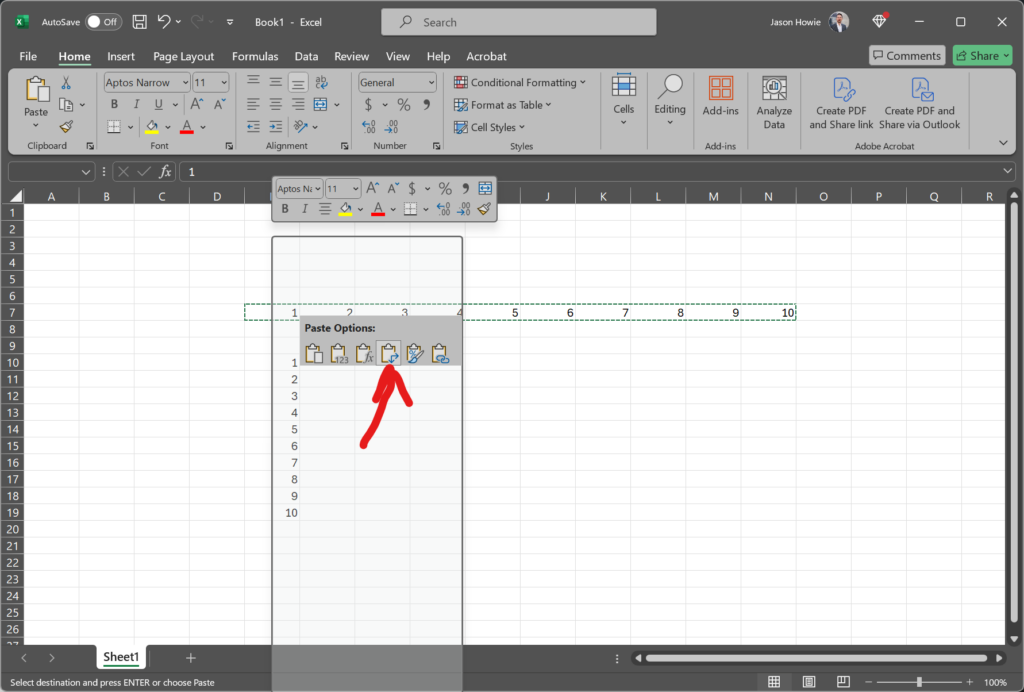
The transpose special paste option in Excel
By utilizing the Paste Special feature in Excel, you can quickly convert rows to columns with just a few simple steps. This method offers flexibility and control over how your data is rearranged, making it a valuable tool for data manipulation tasks. Whether you prefer the Transpose function or the Paste Special method, Excel provides multiple options to streamline the process of transforming your data layout.
Troubleshooting Common Issues
While changing rows to columns in Excel is a relatively straightforward process, you may encounter some issues along the way. Let’s address a couple of common problems and their solutions.
Dealing with Error Messages
If you receive an error message during the transpose process, make sure that the destination range is empty and has enough space to accommodate the transposed data. Additionally, check if the original data range includes any merged cells, as these cannot be transposed directly.
Handling Large Data Sets
When dealing with large datasets, the transpose operation may take longer to complete or even cause Excel to freeze. To avoid these issues, consider breaking down your data into smaller chunks and performing the transpose operation on each section individually.
Tips for Efficient Data Transformation
Here are a few handy tips to streamline your row-to-column transformation process:
Keyboard Shortcuts for Faster Transformation
Learning keyboard shortcuts can significantly speed up your data transformation tasks. Some useful shortcuts include “Ctrl+C” to copy, “Ctrl+V” to paste, and “Ctrl+T” to launch the Paste Special dialog box.
Keeping Your Data Organized Post-Transformation
After transforming rows to columns, it’s essential to organize your data effectively. Use appropriate row and column labels, apply formatting to enhance readability, and consider using data filters or pivot tables to analyze the transformed data more efficiently.
Changing rows to columns in Excel can greatly enhance data analysis and presentation. By following the step-by-step guide provided in this article, you can transform your data quickly and efficiently. Remember to prepare your sheet properly, troubleshoot any issues that arise, and utilize helpful tips for smooth data transformation. Happy Excel-ing!
